Eurotherm Temperature Controllers can be connected to a PC using our custom RS232 to USB cable solution. This tutorial will explain how to wire the cable to your controller, install the drivers, and connect the controller to your PC.
* Note: For 3000 Series controllers and nanodacs you could use the USB CPI clip instead.
Section 1: Things You Will Need Before Starting
- RS232 communications module installed in your controller (See Section 2)
- Note: If you have just installed a communications module for the first time, you may see a Hardware
Error on the screen. If so, we have a quick video showing how to clear this error. - Power cable to power the controller
- The driver for the USB cable, which can be found here.
- Eurotherm iTools Engineering Studio Software, which can be downloaded from Eurotherm or the Resources Section
Section 2: Communications Module Table
| Controller | Communications Module |
|---|---|
| 2216e / 2208e / 2204e | SUB22/2AM |
| 2416 / 2408 / 2404 | SUB24/EIA232 (A2 or AM) |
| 2604 / 2704 | SUB24/EIA232 (A2) |
| 3216 / 3208 / 3204 | 2XL (* see note below) |
| 3508 / 3504 | SUB24/EIA232 (A2) |
* 3216, 3208, and 3204 controllers are fixed build, meaning you can not add modules after purchasing. If you have one of these units and you want to use this cable, your controller must already have 2XL in the model code. |
|
Section 3: Instructions
- Start off by installing the USB driver (See Section 1-4)
- Wire the USB cable to your controller (Note: the terminal block should already be wired for you)
| 9 PIN RS232/Terminal Block | Controller Terminal | Cable Color |
|---|---|---|
| GND | HD | White |
| R+ | HE | Black |
| T+/D+ | HF | Red |
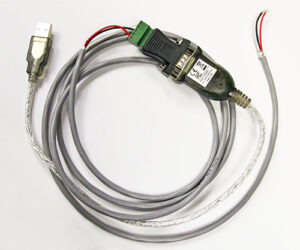
- Connect your power cable to the controller's L & N terminals, plug it into a power outlet, and then connect the USB cable to your computer
- This is what everything should look like all wired up:
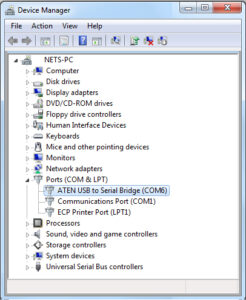
- After installing the USB driver, you will need to find out what COM port the USB driver has selected. To do this, navigate to the
Control Panel, select Device Manager, go to Ports (COM & LPT) and look for
“ATEN USB to Serial Bridge”, and take note of what COM port is in parenthesis. Note: This won’t show up unless the controller is powered up and plugged into your computer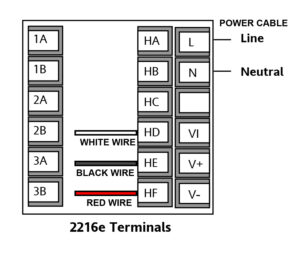
- You will also need to install Eurotherm iTools software. When installing iTools, the very last step should be the
Registry Settings.- Navigate to Serial Ports and make sure the COM port you noted above is selected.
- Click apply, and then OK.
- If another screen pops up, make sure Enabled is selected, and all parameters match the below screen shot,
then press OK. - Note: If you already had iTools installed on your computer, you can access this menu by navigating to Control Panel -> iTools
- Open the iTools Engineering Studio, and click the “Scan” button. Select the following:
- Scan all device addresses (255 first, then 1 to 254)
- Scan for Eurotherm devices only
- Terminate Scan when first device found
- It should look like the following image:
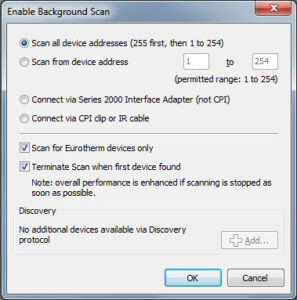
- Click “OK” and iTools should now scan and find your controller.
Related Resources
- Installing Communications Modules on Eurotherm 2204e or 2208e Temperature Controllers
- How to clear a Hardware Error caused by changing modules on a Eurotherm Temperature Controller
- How to Clone Eurotherm Temperature Controllers
- Shop for Temperature Controllers
- Shop for Communications Modules / USB Cables